Uncover the most inspiring cycling documentaries that showcase grit, passion, and the raw human spirit behind the world’s most challenging rides.
WHAT ARE THE TOP CYCLING PHOTOGRAPHY TIPS?
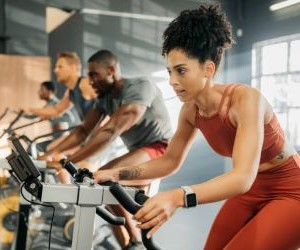
Mastering cycling photography requires more than a good camera. From shutter speeds to scenic compositions, these pro tips will elevate your shots. Whether you're snapping during a race or documenting a mountain trail, knowing when and how to shoot makes all the difference. In this guide, we cover the essential techniques—from choosing the right gear and understanding natural lighting to advanced editing and storytelling. You’ll also learn how to anticipate motion and compose emotionally resonant images that truly ride with the moment. Get ready to transform your cycling shots into high-impact visuals with real-world advice.

Understanding motion and speed
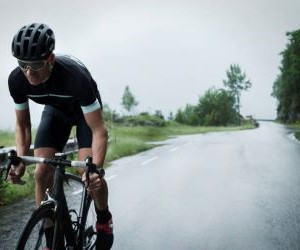
Capturing fast-moving cyclists requires technical precision and a deep understanding of motion. Unlike static photography, cycling photography involves rapid subject movement, varying light conditions, and unpredictable dynamics. A key technique is mastering shutter speed. A fast shutter speed—like 1/1000 or faster—is ideal to freeze a rider in motion without blur. This is critical in high-speed road races or downhill mountain biking scenarios.
Timing is everything
To create dynamic shots, photographers need to anticipate where the rider will be. This means understanding the course, knowing when a cyclist will hit a jump, turn, or sprint. Pre-focus on a spot where the action will peak, and be ready to shoot in burst mode to capture multiple frames per second. This increases your chances of getting that perfect moment—the grit on their face, the lean into a corner, or the spray of mud from a tire.
Use continuous autofocus (AI Servo/AF-C) to track moving subjects
Shoot in burst mode to capture a sequence of shots
Adjust ISO to ensure enough light without motion blur
Experiment with panning for a sense of speed
Practice at local races or trails to build timing instincts
Understanding motion also means playing with it. Instead of always freezing action, use a slower shutter (1/60 or 1/30) and pan the camera with the cyclist’s motion. This technique blurs the background while keeping the subject sharp, creating a powerful sensation of speed. It takes practice, but the results are visually striking.

Mastering lighting and composition
Lighting can make or break a cycling photo. Shooting during golden hour—shortly after sunrise or before sunset—yields warm tones and long shadows that add drama and depth. Avoid harsh midday light when possible, as it creates strong contrast and washes out colors. Overcast days are also excellent for cycling photography because of the even lighting and reduced shadows.
Framing for emotion and movement
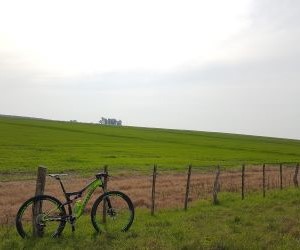
Compositionally, think about what story you’re telling. Is it the isolation of a solo rider in a vast landscape? The intensity of a neck-and-neck race finish? Or the camaraderie of a group ride? Use leading lines like roads, trails, or fencing to guide the viewer’s eye toward the subject. The rule of thirds is also key: avoid placing your subject dead center. Instead, position them along one of the third lines to create a more compelling visual.
Shoot from low angles to emphasize speed and motion
Include environmental elements—trees, buildings, fog—for storytelling
Experiment with silhouettes during sunrise or sunset
Use natural frames—arches, tree branches—for visual depth
Keep the horizon level unless you’re intentionally going for a dramatic tilt
Lighting also plays into mood. For high-contrast, gritty vibes, consider shooting in black and white, especially on overcast days. For epic, magazine-worthy shots, backlighting a rider with the sun low in the sky creates rim light around the subject. A lens hood or filter can help control flare and protect your lens when shooting into the sun.
Gear, settings, and post-editing tips
The right gear elevates your photography game, but it doesn’t have to break the bank. A DSLR or mirrorless camera with a fast lens (f/2.8 or faster) gives you better control over depth of field and light intake. Lenses in the 70–200mm range are great for compressing background and focusing on subjects without getting too close. For wide-angle trail shots, a 24mm or 35mm lens adds cinematic flair.
Essential settings and accessories
Shoot in RAW format to preserve image data for post-processing. Use manual or shutter-priority mode to control exposure and motion. Keep your aperture wide (f/2.8–f/5.6) for subject isolation, and adjust ISO based on light conditions. A monopod or gimbal helps with stabilization, especially for panning shots or video. Don’t underestimate the power of a polarizing filter—it can reduce glare, deepen skies, and make colors pop.
Carry extra batteries and memory cards
Use weatherproof bags or lens covers in variable climates
Calibrate your monitor for accurate editing colors
Use Lightroom or Capture One for professional-level edits
Apply local adjustments to highlight riders and de-emphasize distractions
Post-editing is where your shots truly come to life. Use contrast and clarity tools to make riders stand out. Adjust white balance to match the lighting mood you intended. Cropping can help fix framing misfires or improve the storytelling. Don't overdo the saturation—natural tones often resonate more. For social media, export high-res versions for desktop viewing and optimized crops for Instagram stories or posts.
YOU MAY ALSO BE INTERESTED